


Do you ever find yourself wishing you could enjoy a delicious, fresh brew from the comfort of your own home? With the proper conditions, growing hops at home is easier than you might think. Whether you’re an experienced gardener or just starting out, hop cultivation can be a fun and rewarding way to enhance your homebrewing experience.
One of the benefits of growing hops at home is that it can be done in any climate. While hop cultivation is traditionally associated with cooler, temperate regions, the right conditions can be created to successfully cultivate hops even in warm climates.
Key Takeaways:
- With the right conditions and techniques, hop cultivation can be done in any climate.
- Homegrown hops can enhance the flavor and aroma of your homebrewed beer.
- Proper soil preparation, watering, and fertilizing techniques are essential for successful hop cultivation.
- Hop plants require pruning and training for optimum growth and yields.
- Harvesting and processing hops requires careful attention to timing and technique to ensure flavor and aroma preservation.
Understanding the Different Hop Varieties
When it comes to growing hops at home, choosing the right hop variety can make all the difference. With so many different hop varietals available, it can be overwhelming to know where to start. That’s why we’ve put together this guide to help you understand the different hop varieties and choose the right one for your specific needs.
Different Hop Varieties
From floral and fruity to earthy and spicy, there are countless hop varieties to choose from. Some popular ones include:
| Hop Variety | Flavor Profile |
|---|---|
| Cascade | Spicy, floral, citrusy |
| Citra | Tropical, citrusy, fruity |
| Amarillo | Flowery, spicy, citrusy |
| Centennial | Floral, spicy, earthy |
These are just a few examples; there are many others to explore. Choosing the right hop variety for your taste preferences and climate is essential for a successful harvest.
Choosing the Right Hop Variety
When selecting a hop variety, there are several factors to consider:
- Flavor profile: What type of beer do you want to make? Different hop varieties are better suited to different beer styles.
- Climate: Some hop varieties do better in warm climates, while others are more suitable for cooler temperatures.
- Growing conditions: Some hop varieties require more space, water, or nutrients than others. Consider your garden’s conditions when selecting a hop variety.
Taking these factors into account will help you choose the right hop variety for your needs.
“Choosing the right hop variety for your homegrown beer is like selecting the perfect spice for your favorite recipe. It can completely transform the flavor and aroma profile of your brew.” – Joe Brewer, Homebrew Enthusiast
Climate considerations for growing hops
When it comes to hop cultivation, climate is a crucial factor that can greatly impact the success of your harvest. Those living in warm climates may face unique challenges when attempting to grow hops, but don’t worry – it’s still possible with proper planning and care. Here are some climate considerations to keep in mind:
- Temperature: Hops thrive in cooler climates, with optimal growing temperatures ranging between 45°F and 75°F. In hotter climates, it’s vital to provide shade or partial shade during the hottest part of the day to avoid heat stress.
- Humidity: Hops require some level of humidity to thrive, but overly humid conditions can increase the risk of disease. Be sure to provide good air circulation and avoid overwatering to prevent moisture buildup.
- Water: In warmer climates, hops require more water to stay healthy and hydrated. Be sure to water consistently, but avoid overwatering as this can lead to root rot.
While the challenges of growing hops in warm climates may be more significant, it’s not impossible with proper planning and care. With a little extra attention, you can enjoy a bountiful harvest of delicious, homegrown hops.
Preparing the Soil and Planting Hops
Proper soil preparation is essential for successful hop cultivation. Before planting, you should test your soil to determine its pH level and nutrient content. Hops prefer well-draining soil with a pH range between 6.0-7.5 and high levels of organic matter. If your soil is not within this range, you can amend it by adding compost, manure or other organic materials to improve its fertility.
When planting hops, it’s important to choose a sunny location with ample space for the plants to grow vertically. You can plant hop rhizomes (root cuttings) or seedlings in the spring after the soil has warmed up and all danger of frost has passed. Before planting, soak the rhizomes in water for a few hours to rehydrate them and promote growth.
Dig holes that are at least 3 feet apart and 2 feet deep. Space multiple rows at least 8 feet apart. Insert a support structure (such as a trellis or pole) at the center of each hole before planting the hop rhizome or seedling. Cover with soil and press down to remove any air pockets. Water the plants thoroughly and add a layer of mulch to retain moisture and suppress weeds.
Tip: Consider companion planting with garlic, chamomile, or marigold to repel pests and improve soil health around your hop plants.
Essential Care and Maintenance of Hops
Now that your hops are planted and starting to grow, it is essential to take proper care of them for a bountiful harvest. One of the most important aspects of hop plant care is watering. It is essential to keep the soil consistently moist, so the plants do not suffer from drought stress. However, be cautious not to overwater, as this can lead to root rot and other issues. As a general rule of thumb, water your hops twice a week, or more frequently if the weather is hot and dry.
Another crucial factor in hop plant care is fertilizing. Hops require a lot of nutrients to thrive, and it is essential to provide them with adequate fertilization. A balanced fertilizer with equal parts nitrogen, phosphorus, and potassium is often recommended. If you notice yellowing leaves or stunted growth, your hops may need additional feeding. Be sure to follow the manufacturer’s instructions carefully to avoid overfertilizing.
Despite your best efforts, you may encounter some issues when growing hops. Common issues include pests such as spider mites and aphids, as well as diseases like downy mildew and powdery mildew. Regular inspection of your hop plants is critical to identify any problems early on. You can often control these issues with organic treatments such as neem oil or copper fungicides.
Overall, proper watering and fertilization, along with proactive pest and disease management, are crucial to the success of your hop plants. By following these essential care and maintenance tips, you can keep your hops healthy and productive throughout the growing season.
Pruning and Training Hop Plants for Better Yields
Maximizing yields and ensuring healthy growth of hop plants is crucial for any home cultivator. And one of the most important practices to achieve this is pruning and training. Let’s explore some effective tips and techniques for pruning hops and training hop plants.
Pruning Hops
Pruning is the process of removing unwanted shoots and leaves from a hop plant, making it easier to manage and more productive.
The ideal time to prune hop plants is in early spring, just as new growth begins. Here are some key tips to keep in mind:
- Remove all old, dead, or diseased wood to prevent the spread of disease
- Thin out the center of the plant to promote better air circulation
- Trim the lateral shoots to 2-3 buds each to promote stronger growth and better yields
- Remove shoots from the bottom of the plant to reduce the risk of pests and diseases
Regular pruning not only helps to improve yields but also aids in pest prevention and disease control.
Training Hop Plants
Training hop plants involves guiding the bines to grow in a specific pattern or direction, which helps to promote healthy growth, increase yields, and make harvesting easier. Here are some popular techniques for training hop plants:
- String Training: This is the most basic and popular way of training hop plants. Insert a pole or stake into the ground next to the plant and attach a string to the top. Tie the hop bine to the string, making sure it grows in a clockwise direction as it climbs.
- Trellis Training: This technique involves building a trellis that the hop bines can wrap around as they grow. This technique is ideal for larger hop yards and can help to produce higher yields.
- Netting Training: Netting training involves hanging a plastic or nylon net near the hop plant and allowing the bines to grow through the openings of the net. This method is ideal for growers with limited space.
Regardless of the training technique used, it is important to trim the hop bines regularly, removing lateral shoots and any dead or diseased parts to ensure maximum growth and yield.
Hop Plant Maintenance
Finally, regular maintenance is essential for healthy hop plant growth. This includes watering the plants regularly, fertilizing the soil as needed, and keeping a watchful eye for pests and diseases. With proper pruning, training, and maintenance, you can enjoy a bountiful hop harvest every season.
Harvesting and Processing Hops
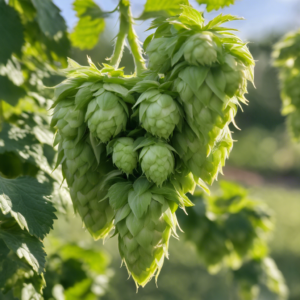
Congratulations! Your hop plants have reached their peak, and it’s time to harvest those beautiful cones. Harvesting hops is a satisfying moment for any brewer and vital for preserving the flavor and aroma of the cones. First, let’s discuss hop maturity, the signs to look for, and what to do when your hops are ripe.
When harvesting hops, you can feel the cones’ dryness and see the color change from bright green to a dull, pale greenish-yellow. You may also detect a sweet, earthy scent emanating from the plants. These are all signs that your hops are ready for picking. Pick the cones gently and carefully using your hands, making sure to avoid touching the lupulin glands, which can cause spoilage.
Once your hops are harvested, it’s time to process them. For maximum freshness and flavor, processing should be carried out immediately after harvesting. The first step is to sort the hops and remove any damaged or diseased cones. Then, place the cones onto a screen or in a hop bag and let them air dry in a warm, dark and well-ventilated area. A fan can be used to increase air circulation. Once the moisture content is reduced to 10-12%, you can move onto the next step of processing.
Next, the dried cones can undergo further processing to preserve them for future use. This usually involves compressing the cones into small pellets or vacuum-sealed bags. You can also store the hops whole in airtight containers such as mason jars or vacuum-sealed bags. Keep stored hops in a cool, dry place away from direct sunlight to maintain their quality and flavor.
With these simple steps, you can enjoy the fruits of your labor for many months to come. Happy brewing!
Drying and Storing Hops for Future Use
After harvesting your hops, it’s essential to dry and store them properly to preserve their quality and flavor. Drying hops reduces their moisture content, making them less susceptible to mold and spoilage during storage.
To dry your hops, spread them out in a thin layer on a screen or cloth in a dry, well-ventilated area away from direct sunlight. You can also use a food dehydrator or oven on low heat, but be sure to monitor the temperature regularly to avoid overheating.
Once the hops are dry, store them in a cool, dark, and dry place, away from oxygen and light. Vacuum-sealed bags or airtight containers work well for hop storage. It’s also a good idea to label and date your bags or containers to keep track of the hop variety and when they were harvested.
Properly dried and stored hops can last up to a year or more, depending on the variety, making it possible to brew your favorite beers year-round.
Tips for Drying and Storing Hops
| Tip | Description |
|---|---|
| Use a hygrometer | A hygrometer can help you monitor the humidity levels during drying and storage to prevent spoilage. |
| Opt for vacuum-sealed bags | Vacuum-sealed bags will remove air and help keep the hops fresh longer. |
| Store hops in the freezer | For long-term storage, hops can be frozen in an airtight container or bag, but they must be completely dried beforehand. Be sure to label the container or bag with the variety and date. |
| Avoid storing hops with strong odors | Hops can absorb strong odors and flavors, so be sure to store them away from any strong-smelling items, such as onions or spices. |
With these tips and techniques, you can ensure the optimal preservation of your hops and enjoy your homegrown brews throughout the year.
Troubleshooting common issues in hop cultivation
While hop cultivation is a rewarding activity, it can be challenging at times. Here are some common problems you may encounter during the process:
Hop diseases
Several diseases can affect hop plants, including downy and powdery mildew, verticillium and fusarium wilt. If you notice any yellowing, shriveling, or spotting on your hop leaves or cones, it may be a sign of these diseases.
To prevent hop diseases, make sure to maintain good airflow and drainage around your plants, practice proper sanitation, and consider using disease-resistant hop varieties. If you do encounter these diseases, prompt identification and treatment with fungicides can be effective.
Common hop pests
A variety of insects can harm hop plants, including aphids, spider mites, and Japanese beetles. These pests can cause discoloration, wilting, and other visible damage to your hop leaves and cones.
To prevent hop pests, consider using natural predators like ladybugs, maintaining weed-free areas around your plants to reduce breeding grounds for pests, and using insecticidal soap or other safe treatments. If you notice pests on your hop plants, prompt action is key to preventing further damage.
Challenges specific to different climates
Depending on where you live, you may encounter unique challenges when cultivating hops, such as heat stress in warm climates or frost damage in cooler regions.
To address these challenges, consider selecting hop varieties that are suited to your specific climate, providing shade or additional watering for plants in hot weather, and taking steps to protect plants from frost damage in colder weather.
Tip: Regular observation and maintenance of your hop plants can prevent and manage potential problems.
FAQ
Q. What are the benefits of growing hops at home?
A. Growing hops at home has several benefits. Firstly, you have control over the quality and freshness of the hops, ensuring the best flavor for your homemade beers. Additionally, growing hops can be a rewarding hobby that allows you to connect with nature and engage in a sustainable practice.
Q. How do I choose the right hop variety for my climate?
A. When choosing a hop variety for your climate, consider factors such as the average temperature, humidity levels, and length of your growing season. You can consult with local experts or do research to find hop varieties that thrive in similar climates to yours. Experimentation is also key in finding the right variety for your specific conditions.
Q. What are some tips for successful hop cultivation in warm climates?
A. Hop cultivation in warm climates can be challenging, but with proper care, it is possible. Some tips include providing adequate shading, maintaining consistent moisture levels in the soil, and selecting heat-tolerant hop varieties. You may also consider implementing irrigation systems or using mulch to retain moisture.
Q. How do I prepare the soil for planting hops?
A. To prepare the soil, start by removing weeds and grass from the planting area. Then, loosen the soil using a garden fork or tiller. Hops prefer well-draining soil, so amend it with organic matter such as compost or manure to improve fertility and drainage. Test the soil’s pH and make adjustments if necessary.
Q. Should I plant hops from rhizomes or seedlings?
A. Hops are typically planted from rhizomes, which are underground stems. Rhizomes are more reliable when it comes to establishing healthy hop plants. Seedlings take longer to grow and are less predictable in terms of hop variety characteristics. However, planting from seedlings can be a fun experiment if you have the time and patience.
Q. How often should I water and fertilize my hop plants?
A. Hop plants require consistent moisture throughout their growing season. Water them deeply once or twice a week, ensuring that the soil is moist but not waterlogged. As for fertilizing, apply a balanced fertilizer in early spring and midsummer, following the manufacturer’s instructions. Avoid over-fertilizing, as it can result in excessive vegetative growth.
Q. Should I prune and train my hop plants?
A. Yes, pruning and training hop plants are essential for better yields and overall plant health. Prune the lateral shoots that emerge from the main bines and train the bines to grow vertically on a sturdy trellis system. This helps improve airflow, reduces disease risk, and maximizes sunlight exposure for optimal hop production.
Q. How do I know when my hops are ready for harvest?
A. Hops are ready for harvest when the flower cones are dry to the touch, feel papery, and have a strong aroma. The lupulin glands, which contain the hop’s essential oils, should be yellow and sticky. You can also gently squeeze the cones to see if they spring back lightly. Harvesting time can vary depending on the hop variety and your climate.
Q. What is the best way to dry and store hops?
A. After harvest, spread the hop cones in a single layer on a screen or a food dehydrator at a low temperature (around 140°F or 60°C) for several hours, until they are dry. Store the dried hops in airtight containers or vacuum-sealed bags in a cool, dark place, such as a refrigerator or freezer. Properly dried and stored hops can last for up to a year.
Q. How can I troubleshoot common issues in hop cultivation?
A. If you encounter common issues in hop cultivation, such as yellowing leaves, browning foliage, or signs of pests or diseases, it is important to identify the problem early. Consult resources on common hop pests and diseases to accurately diagnose the issue and take appropriate action, whether it’s implementing organic pest control methods or seeking professional advice.
Q. Where can I find additional resources for hop cultivation?
A. There are several resources available for hop growing enthusiasts. You can join online forums and communities dedicated to hop cultivation, read books and publications on the topic, or attend workshops and seminars offered by local brewing associations or agricultural agencies. These resources can provide valuable insights and support for your hop cultivation journey.
Conclusion
Congratulations! You have completed the comprehensive guide to growing hops at home. We hope this article has provided you with the knowledge and inspiration to successfully cultivate hops, regardless of your climate.
As a hop growing enthusiast, you know that hop cultivation is a rewarding journey that requires care and dedication. Remember to choose the right hop variety for your climate, prepare your soil correctly, and provide your plants with the essential care and maintenance they need to thrive.
If you encountered any issues during your cultivation journey, don’t worry! Our troubleshooting section provides helpful tips and techniques to address common pests, diseases, and other challenges.
To further explore the world of hop cultivation, we encourage you to check out our recommended resources section. Here, you will find additional information and guidance on hop growing techniques, equipment, and more.
Thank you for reading, and we wish you the best of luck in your hop growing adventures!


